Monday, 29 August 2016

AMK 1:48 Mig 31 B/BS

Review Built  

Part 3


Here in the UK we have had a three day weekend, so this entry is the progress of the build over the past three days. Once again I must sing the praises of this wonderful kit, the quality and fit is wonderful.

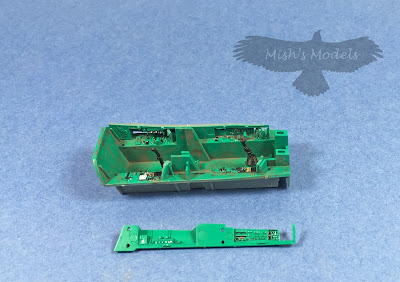
As I've never built an AMK model before I'm religiously following the supplied instructions, with the exception of where I can see that they will make things awkard when it come to spraying the model. The instruction booklet next called for me to assemble, paint and decal the cockpit.

Firstly I primed and painted the cockpit 'tub' and side pieces with Mig AMMO Russian Cockpit Green.
 
 
Next I applied the decals to the cockpit sides, the front and rear instrument panels, the decals are really thin and conformed nicely over the moulded cockpit detail with just minimal amounts of decal solution.


I followed up with an application of Mig Neutral Wash. Once dry I removed most of the wash to leave some where I thought the cockpit might look a little grimey.

The instructions then call for the cockpit 'tub' to be slid into the fuselage nose section. The fit is very tight and it did take me a bit of experimentation to find the exact spot that the 'tub' needed to be. 

 
Next up, is to locate the cockpit fuselage part to the main fuselage. However, before you do this, the instructions call for you to add 30 grams of nose weight undern the cockpit tub. I elected not to do this as I will be adding lead shot in the radome, which will have the advantage of being further forward of the model's fulcrum point.

 
The engine air intakes where the next sub assemblies called for in the instructions. Once again, I sprayed the parts with MR. PAINT and once dry, I added some Mig AMMO Black/Green wash to give the parts a grubby look.

 
Once assembled and set I added the intakes to the main assembly. It was here that I needed to test and get the intakes to fit as the kit tolerances are so fine that if any error creeps into your build it makes fitting difficult. Somewhere along the line I must have made the smallest of mistakes as once I had the intakes in place and cemented I did need just the smallest amount, a slight wipe of filler between the intakes and the main assembly.


The next stage called for me to move to the opposite end of the model and assemble the twin tail assemblies. 


Once assembed and set, the tails was added to the main assembly. The fit is again very good, however, again due to my inaccuracies, I needed just a wipe of filler on the underside of the jet pipes.


The instructions would now have you start putting the undercarriage doors in place however, as I will be masking the gear bays when I spary I jumped ahead a couple of stages and started work on the seats.


Next time I get to the bench I will be adding the photo etch seat belts to the seats and fitting them to the cockpit.

Monday, 22 August 2016


ICM 1:48 JU 88 A-4

In Box Review


The Ju 88A-4 was an improved variant of Junkers famous Schnellbomber ("fast bomber").  It featured a longer wingspan, due to the redesigned wingtips. Stronger defensive armament was added and the  Jumo 211 J-1 or J-2 engines given a boost in power to 1410 hp driving wooden bladed propellers. The undercarriage was reinforced and provision for four external bomb racks was added.


In the box are:

 8 grey sprues
1 clear sprue
A decal sheet
An instruction booklet 

On first inspection, it would appear that all of the sprues from the previous release are in this boxing. However, there are two new sprues with extra parts for this variant. This does mean that there is some spare parts in the box which will be loved by those modellers who keep the parts from kits that they haven't used in the build.

The sprues are of good quality with no flash. I could see no sink marks and the ejector pin marks appear to me in places that would show. The larger parts have no marks or blemishes sometimes seen because of temperature variants in the mould, although I have heard of such blemishes in some boxes, however reports say they don't affect the quality of the kit.

The instructions: 


The centre stapled instruction booklet consists of 24 pages and is very comprehensive, with detail drawings of each assembly stage including three paged of full colour painting and decal guides.

The decals:

 ICM has provided four decal options,:

Ju 88A-4, 9/KG 30 Sicily, Spring 1943
Ju 88A-4,stabSt/KG 3, Russia Spring 1942
Ju 88A-4, Stab 1/KG 77, Russia Spring 1942
Ju 88A-4, 8/KG 3 Russia Winter 1942

The decals are clear, bright and in register with minimal carrier film.
  

The sprues:


 The engines are reasonably detailed.


The clear parts are all free from blemishes and are very clear.

Conclusion:

ICM are once again on the ball with this offering of the Ju 88. The cost balanced against the quality mean that in my opinion, this is a kit that is a must for any modeller that is keen on WWII Luftwaffe planes. Having been lent this kit for review I'm very tempted to purchase one for myself.

I'm indebted to my Good Friend Darren Wilks for the loan of the kit for review, the problem is I have to give it back now!

Sunday, 21 August 2016

AMK 1:48 Mig 31 B/BS

Review Built  

Part 2


Following on from Part 1 of my build review of AMK's wonderful kit, this time I finish off the build of the engines and engine intakes, add them to the lower fuselage and make a start on the upper fuselage and wings.

First job was to finish off the landing gear bays which are constructed as part of the engine intakes.


Again the fit is excelent with no filler and minimal triming required. Painted with Alclad Light Aluminium and to lift the detail in the bays and to make them look nice and dirty I gave them a wash with Mig AMMO Black/Green wash.

Once dry the intakes, bays and the kits engines were added to the lower fuselage. Once again no work was required other than to file the cut sprue flashes.


As you can see the fit and the detail is awesome.


Next job was to build the nose wheel bay and assembly. Once again painted with Alclad Dull Aluminium and made to look used and a bit grubby with the same Mig AMMO wash used on the main landing gear bays.


Once dry, the nose wheel assembly was cemented into the lower fuselage half. The fit being the same as the rest of the kit, it just slotted into place.


At this point the lower fuselage assembly was put to one side and a start was made on the wings and upper fuselage assembly.


As the joins were still drying I only test fitted the upper and lower fuselages halves together, and once again everything fitted perfectly. 


I'm really enjoying this kit and built, the further I get into the build the more I feel that AMK are well on their way to taking away Tamigawa's shake and bake crown.

Next time the upper and lower fuselage halves go together and a start will be made on the cockpit and nose section.

Saturday, 23 July 2016

AMK Mig 31 B/BS
Review Build
Part 1 


Following on from my box review of AMK's latest boxing of the Mig 31 Foxhound. I have, as promised started this build review. This part covers the engines and intake assemblies. My first impressions on test fitting the parts are that AMK have, once again produced another beauty. The quality of the fit rivals, if not exceeds some kits from the 'big' manufacturers. Parts fit well requiring no trimming and only require removal of the sprue gate marks left after removing the parts from the main sprue trees. Some of the parts litrerally 'click' together.
 

The first assembly that the instructions call for is the assembly of the rear part of the engines. My research shows that these are painted green when new but with use and the passing of time build up with a 'sandy' coloured exhaust deposit along with some 'sooting'.
I painted the the interior surfaces with MR. Paint US WWII interior green which seems to be a very close match to the reference photos I found on the web. The interior was then weathered with Tamiya Weathering System pigments. Starting with sand and building up with soot and oil stain. I'm pleased with the end result which is what I had in my mind's eye at the start of the stage.


The next stage was to put all the engine parts in one half of the engine casings, the turbine assemblies having been painted with Alclad Burnt Iron. All the parts fit well and are located with a 'peg and slot' arangement.


Final assembly of the engine was to cement the opposite half of the engine. Once set the outer surface was again painted with Alclad Burnt Iron. I may pick out some of the impressive detail but I doubt any of it will ever be seen.
 

The next stage that the instructions called for is the assembly of the superbly detailed engine air intakes. Before assembly these were sprayed with Alclad Dull Aluminium, then weathered with a dark grey-black Mig AMMO wash. This really picked out the detail nicely.
 

 Once assembled the intakes look great and the wash add the grimy 'engine look'.


The next stage was to add the undercarriage bays, these were again painted with Alclad 
Dull Aluminium and again weathered with Mig AMMO wash.

This concludes part one of my review build, I plan that the next part will cover assembly of the undercarriage bays and placing the engines in the fuselage, but this of course is subject to how long I can find time to spend at the modelling bench.

Monday, 4 July 2016


1:48 Mig-31B/BS Foxhound 
Avantgarde Models Kits


The Mig-31 Foxhound was designed to replace the Mig-25 Foxbat. Developed in great secrecy, with may improvements over the Mig-25, the Mig-31 succeded in overcoming the Mig 25's short comings. Fitted with advanced radar and a new targeting computer it allowed  the crew to engage multiple targets, also added was a true look down/shoot down ability. The Mig-31B was fitted with in-flight refuelling capability whilst The Mig-31BS was an upgraded base model that eventually replaced  the Mig-31B during the 90s. 

In the Box 

The kit is essentially similar to AMK's earlier Mig-31BS/BSM boxing released in 2015. Based on constructive feedback from the modelling community several improvements have been made such as photo etch seatbelts, instrument decals, Germetika decals for the cockpit and tinted canopy parts.

The box is jam packed with three smaller boxes containing the lower fuselage, forward fuselage and weapons. The remainder of the sprues are in packed in resealable plastic bags

Contents:
 

29 x sprues including the afore mentioned parts in boxes.
Two sprues of clear parts in clear and tinted styrene.
Ten smaller sprues for the missiles.
One Photo-Etch (PE) fret of brass.
One instruction booklet.
Two decal sheets. 

Instruction booklet:

The instructions are a 21 page stapled booklet with very detail, fine line drawings and coloured painting guides with Mr Hobby paint call outs.


 The sprues

These are moulded in grey styrene and are very finely engraved and have some lovely detail all very sharp and crisp.


 X2


 X2

The missiles

There are enough missiles provided so that any load out can be catered for (there is a comprehensive load out guide in the instruction booklet).

 X4 Vympel R-33 AA-9 Amos long range missiles
X2 R-40 AA-6 Acrid long range missiles
 X4 R-60 AA-8 Aphid Infrared missiles

Clear parts

Two sprues are provided allowing you to build a plane with totally clear canopies or with 'gold' tinted canopies.


Photo Etch

This includes among other parts, the seat harnesses, radar emitter antenna.


Decals 

 Out of the box you can build three versions using the supplied decals
  • Mig-31BS 16 Blue Russian Air Force, Chelyabinsk-Shagol Airbase 2014.
  • Mig-31BS 23 Red Kazakhstan Air Force, 2012.
  • Mig-31B 73 Blue one of several operated by the training unit at Savasleyka Air Base.


Conclusion

Was it possible for AMK to improve on their already impressive BS/BSM offering? You bet it was, after listening to the feedback provided by the modelling community AMK in my opinion have upped the stakes when it comes to modern kits. Good moulding, detail, weapons instruction and decals along with a willingness to work with their customers are marking AMK out as a kit manufacturer to watch in the future.

It has been said by some modellers that by producing a Russian aircraft, AMK will only attract a niche proportion of the modelling community. That said, I don't normally build modern jet aircraft but this kit will be at the top of my build pile so watch out for a build review on Mish's Models Facebook page in the very near future.

Many thanks to AMK who via Mr James Hatch of Large Scale Models forum kindly provided this review sample.