Monday, 29 August 2016

AMK 1:48 Mig 31 B/BS

Review Built  

Part 3


Here in the UK we have had a three day weekend, so this entry is the progress of the build over the past three days. Once again I must sing the praises of this wonderful kit, the quality and fit is wonderful.

As I've never built an AMK model before I'm religiously following the supplied instructions, with the exception of where I can see that they will make things awkard when it come to spraying the model. The instruction booklet next called for me to assemble, paint and decal the cockpit.

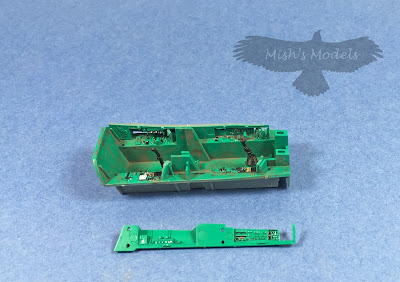
Firstly I primed and painted the cockpit 'tub' and side pieces with Mig AMMO Russian Cockpit Green.
 
 
Next I applied the decals to the cockpit sides, the front and rear instrument panels, the decals are really thin and conformed nicely over the moulded cockpit detail with just minimal amounts of decal solution.


I followed up with an application of Mig Neutral Wash. Once dry I removed most of the wash to leave some where I thought the cockpit might look a little grimey.

The instructions then call for the cockpit 'tub' to be slid into the fuselage nose section. The fit is very tight and it did take me a bit of experimentation to find the exact spot that the 'tub' needed to be. 

 
Next up, is to locate the cockpit fuselage part to the main fuselage. However, before you do this, the instructions call for you to add 30 grams of nose weight undern the cockpit tub. I elected not to do this as I will be adding lead shot in the radome, which will have the advantage of being further forward of the model's fulcrum point.

 
The engine air intakes where the next sub assemblies called for in the instructions. Once again, I sprayed the parts with MR. PAINT and once dry, I added some Mig AMMO Black/Green wash to give the parts a grubby look.

 
Once assembled and set I added the intakes to the main assembly. It was here that I needed to test and get the intakes to fit as the kit tolerances are so fine that if any error creeps into your build it makes fitting difficult. Somewhere along the line I must have made the smallest of mistakes as once I had the intakes in place and cemented I did need just the smallest amount, a slight wipe of filler between the intakes and the main assembly.


The next stage called for me to move to the opposite end of the model and assemble the twin tail assemblies. 


Once assembed and set, the tails was added to the main assembly. The fit is again very good, however, again due to my inaccuracies, I needed just a wipe of filler on the underside of the jet pipes.


The instructions would now have you start putting the undercarriage doors in place however, as I will be masking the gear bays when I spary I jumped ahead a couple of stages and started work on the seats.


Next time I get to the bench I will be adding the photo etch seat belts to the seats and fitting them to the cockpit.

Monday, 22 August 2016


ICM 1:48 JU 88 A-4

In Box Review


The Ju 88A-4 was an improved variant of Junkers famous Schnellbomber ("fast bomber").  It featured a longer wingspan, due to the redesigned wingtips. Stronger defensive armament was added and the  Jumo 211 J-1 or J-2 engines given a boost in power to 1410 hp driving wooden bladed propellers. The undercarriage was reinforced and provision for four external bomb racks was added.


In the box are:

 8 grey sprues
1 clear sprue
A decal sheet
An instruction booklet 

On first inspection, it would appear that all of the sprues from the previous release are in this boxing. However, there are two new sprues with extra parts for this variant. This does mean that there is some spare parts in the box which will be loved by those modellers who keep the parts from kits that they haven't used in the build.

The sprues are of good quality with no flash. I could see no sink marks and the ejector pin marks appear to me in places that would show. The larger parts have no marks or blemishes sometimes seen because of temperature variants in the mould, although I have heard of such blemishes in some boxes, however reports say they don't affect the quality of the kit.

The instructions: 


The centre stapled instruction booklet consists of 24 pages and is very comprehensive, with detail drawings of each assembly stage including three paged of full colour painting and decal guides.

The decals:

 ICM has provided four decal options,:

Ju 88A-4, 9/KG 30 Sicily, Spring 1943
Ju 88A-4,stabSt/KG 3, Russia Spring 1942
Ju 88A-4, Stab 1/KG 77, Russia Spring 1942
Ju 88A-4, 8/KG 3 Russia Winter 1942

The decals are clear, bright and in register with minimal carrier film.
  

The sprues:


 The engines are reasonably detailed.


The clear parts are all free from blemishes and are very clear.

Conclusion:

ICM are once again on the ball with this offering of the Ju 88. The cost balanced against the quality mean that in my opinion, this is a kit that is a must for any modeller that is keen on WWII Luftwaffe planes. Having been lent this kit for review I'm very tempted to purchase one for myself.

I'm indebted to my Good Friend Darren Wilks for the loan of the kit for review, the problem is I have to give it back now!

Sunday, 21 August 2016

AMK 1:48 Mig 31 B/BS

Review Built  

Part 2


Following on from Part 1 of my build review of AMK's wonderful kit, this time I finish off the build of the engines and engine intakes, add them to the lower fuselage and make a start on the upper fuselage and wings.

First job was to finish off the landing gear bays which are constructed as part of the engine intakes.


Again the fit is excelent with no filler and minimal triming required. Painted with Alclad Light Aluminium and to lift the detail in the bays and to make them look nice and dirty I gave them a wash with Mig AMMO Black/Green wash.

Once dry the intakes, bays and the kits engines were added to the lower fuselage. Once again no work was required other than to file the cut sprue flashes.


As you can see the fit and the detail is awesome.


Next job was to build the nose wheel bay and assembly. Once again painted with Alclad Dull Aluminium and made to look used and a bit grubby with the same Mig AMMO wash used on the main landing gear bays.


Once dry, the nose wheel assembly was cemented into the lower fuselage half. The fit being the same as the rest of the kit, it just slotted into place.


At this point the lower fuselage assembly was put to one side and a start was made on the wings and upper fuselage assembly.


As the joins were still drying I only test fitted the upper and lower fuselages halves together, and once again everything fitted perfectly. 


I'm really enjoying this kit and built, the further I get into the build the more I feel that AMK are well on their way to taking away Tamigawa's shake and bake crown.

Next time the upper and lower fuselage halves go together and a start will be made on the cockpit and nose section.