AMK 1:48 Mig 31 B/BS
Review Built
Part 3
Here in the UK we have had a three day weekend, so this entry is the progress of the build over the past three days. Once again I must sing the praises of this wonderful kit, the quality and fit is wonderful.
As I've never built an AMK model before I'm religiously following the supplied instructions, with the exception of where I can see that they will make things awkard when it come to spraying the model. The instruction booklet next called for me to assemble, paint and decal the cockpit.
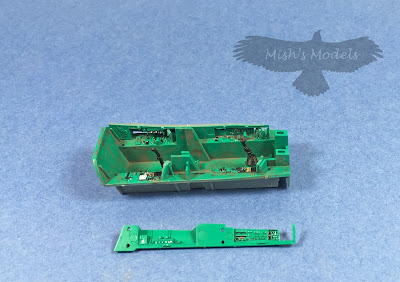
Firstly I primed and painted the cockpit 'tub' and side pieces with Mig AMMO Russian Cockpit Green.
Next I applied the decals to the cockpit sides, the front and rear instrument panels, the decals are really thin and conformed nicely over the moulded cockpit detail with just minimal amounts of decal solution.
I followed up with an application of Mig Neutral Wash. Once dry I removed most of the wash to leave some where I thought the cockpit might look a little grimey.
The instructions then call for the cockpit 'tub' to be slid into the fuselage nose section. The fit is very tight and it did take me a bit of experimentation to find the exact spot that the 'tub' needed to be.
Next up, is to locate the cockpit fuselage part to the main fuselage. However, before you do this, the instructions call for you to add 30 grams of nose weight undern the cockpit tub. I elected not to do this as I will be adding lead shot in the radome, which will have the advantage of being further forward of the model's fulcrum point.
The engine air intakes where the next sub assemblies called for in the instructions. Once again, I sprayed the parts with MR. PAINT and once dry, I added some Mig AMMO Black/Green wash to give the parts a grubby look.
Once assembled and set I added the intakes to the main assembly. It was here that I needed to test and get the intakes to fit as the kit tolerances are so fine that if any error creeps into your build it makes fitting difficult. Somewhere along the line I must have made the smallest of mistakes as once I had the intakes in place and cemented I did need just the smallest amount, a slight wipe of filler between the intakes and the main assembly.
The next stage called for me to move to the opposite end of the model and assemble the twin tail assemblies.
Once assembed and set, the tails was added to the main assembly. The fit is again very good, however, again due to my inaccuracies, I needed just a wipe of filler on the underside of the jet pipes.
The instructions would now have you start putting the undercarriage doors in place however, as I will be masking the gear bays when I spary I jumped ahead a couple of stages and started work on the seats.
Next time I get to the bench I will be adding the photo etch seat belts to the seats and fitting them to the cockpit.


No comments:
Post a Comment