Wednesday, 16 November 2016

Special Hobby
Tempest Mk. V
(Standard boxing)

The Hawker Tempest was arguably the best fighter aircraft used by the Royal Air Force in the Second World War. The Tempest was an improved derivative of the Hawker Typhoon, originally known as the Typhoon II, which was intended to overcome the Typhoon's problems of performance at higher altitudes by replacing the wing with a thinner laminar flow wing. After all the modifications the resulting aircraft greatly differed from the Typhoon, the powers that be chose to rename the aircraft, Tempest. The Tempest emerged as one of the most powerful fighters of the WWII and was the fastest propeller-driven aircraft of the war at low altitude.

Early 1943 saw a production line for the Tempest V  established at Hawker's Langley facility. Production was initially slow, with blame being attributed to problems encountered with the rear spar.
In June 1943, the first production Tempest V, JN729, rolled off the production line and the maiden flight was made by test pilot Bill Humble. Several of the early production aircraft was used for experimental purposes; a number took part in extensive service trials at  RAF (later RAE) Boscombe Down. These including the fitting of external stores, including 500 lb (227 kg) and 1,000 lb (454 kg) bombs and 3 in (76.2 mm) RP-3 rockets, very few Tempest Vs used these stores operationally during the War. In early April 1944, the Tempest V attained general clearance.
During the production of the first batch of 100 Tempest V "Series Is", which all carried the serial number prefix JNxxx, had several improvements were progressively introduced and were used on all following Tempest V "Series 2s", with carried the serial number prefixes EJ, NV and SN. The rear  fuselage joint originally had twenty external reinforcing "fishplates", similar to those fitted to the Typhoon. However, it was not too long before the rear fuselage was strengthened and the fishplates were no longer needed. This meant that the rear fuselage became detachable. The first series of Tempest Vs had a built-up rear spar bulkhead assembly situated just behind the cockpit, which was adapted from the Typhoon. The small blisters on the upper rear wing root fairing covered the securing bolts. This was later changed to a lightweight assembly which connected to new spar booms; the upper wing root blisters were then replaced by small "teardrop" fairings under the wings.
The first 100 Tempest Vs were fitted with 20 mm Hispano Mk.IIs with had long barrels which projected ahead of the wing leading edges and were covered by short fairings. Later Tempest Vs switched to the short-barrelled Hispano Mk.Vs, where the muzzle was flush with the leading edges. The early Tempest Vs used Typhoon-style 34" x 11" five-spoke wheels, but most had smaller 30" x 9 " four-spoke wheels. The new spar of the Tempest V allowed for up to 2,000 lbs of external stores to be carried underneath the wings.
As in all mass-produced aircraft, there may well have been some overlap of these features as new components became available. In mid to late 1944 other features were introduced to both the Typhoon and Tempest: A Rebecca transponder unit was fitted, with the associated aerial under the portside centre section.
In spite of the Tempest V being the RAF's best low to medium-altitude fighter, it was not equipped with the new Mk IIC gyroscopic gunsight, as fitted in RAF Spitfires and Mustangs and one which considerably improved the chances of shooting down enemy aircraft.
Two Tempest Vs, were fitted with Napier Sabre Vs and experimented with several different Napier-made annular radiators, which resembled the ones used on was Tempest IIs. This configuration proved to generate less drag than the standard "chin" radiator, which meant an improvement in the maximum speed of some 11 to 14 mph. One of the test Tempests were later fitted with a ducted spinner, similar to that fitted to the Fw 190 V1. Another experimental Tempest V was fitted with a Vickers 47 mm "P" anti-tank gun, this development was never deployed in this layout.


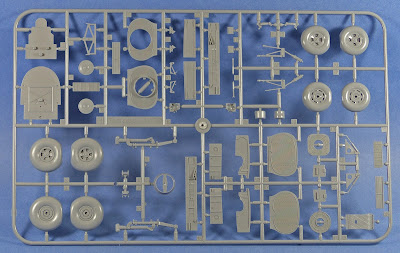
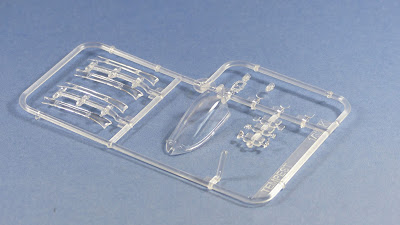
Special Hobby's released this standard boxing of their Tempest Mk. V following on from their Hi-Tech boxing. The Hi-Tech boxing contained lots of resin and photo etch, whilst this boxing omitted the resin and PE, which should appeal to those modellers who do not like working with detailing parts and just want a standard kit, or to those modellers that want to add their own versions of after market parts which are begining to appear on the market this will allow the modeller to detail the kit to their own specification. This also means that the kit costs less for those modellers on a tighter budget  The basic kit is the same as the hi-tech boxing with same detailed parts. 


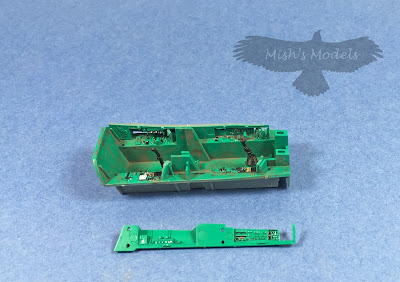
The build follows the tried and tested formula of constructing the cockpit first followed by the fuselage and wings. The cockpit as with the rest of the kit is well detailed. However, I would be very tempted to add some aftermarket seatbelts whether they be photo etch or fabric. The latter in my opinion look and lay more natural.


The level of drtailing can be seen from the following photos:


There are four markings options in this boxing, all share the same Ocean Grey/Dark Green camo
Schemes in the box are:
  • NV969 / SA-A No. 486 [NZ] Sqn RAF, Fasberg, Germany April 1945. Personal machine of Sqd Ldr Warren "smokey" Schrader,
  • JN862 / JF-z, No.3 Sqn RAF, RAF Station Newchurch August 1944. Full invasion striped carried. 
  • EJ705 / W2-X No.80 Sqn RAF. Vokel, Netherlands Jan 1945, (only under fuselage stripes carried)
  • SN165 / ZD-V No. 222 Sqn RAF, Malden, Netherlands April 1945


The supplied decals are on three sheets. The decals are printed by Eduard for Special Hobb. The register and colour are good  as is the  sharpness of the printing.


Conclusion

My thanks to  Special Hobby who supplied this wonderful review kit.
 

Saturday, 10 September 2016

Grex Genesis XGi

Grex Genesis. XGi

Airbrush review

The Genesis.XGi is the gravity fed version of the two latest airbrushes that showcase highlight Grex's  continuing airbrush innovation. With this airbrush, they focused on ergonomics and adaptability. The design element is the ergonomic hand grip set that provides improved comfort and handling. It is specifically engineered for maximum adaptability by using the already wide selection of accessories available from Grex


The first thing you will notice on opening the box are the bright (Grex) green, ergonomic finger grip and 'trigger' button cover. Once you pick up the airbrush, and believe me you will want to pick it up, it just falls naturally into your hand. 

In the box you get:
  • Three paint cups; 2ml (1/20 oz.), 7ml (1/4 oz.), 15ml (1/2 oz.)*
  • Two nozzle tips 
  • Hose connector
  • Nozzle spanner
 *Each paint cup has a lid to help prevent spills


First impressions are; apart from the sheer quality that all Grex airbrushes exude, is of chunky and easy to hold airbrush. The shape of the ergonomic grip lends itself perfectly to the shape of your hand and it is immediately obvious the intended way to hold the airbrush. 


In the above photo, you will see that I have quite large hands and long fingers, with the 7ml paint cup fitted my 'trigger' finger is quite cramped by the paint cup, so I have opted you use the XGi with the 'trigger' button ergonomic 'pad' removed. However, this is a personal choice and only made necessary by my larger hands and long fingers. With both the smaller 2ml and larger 15ml cups I don't have any problem.

So from the above you will have realised that the ergonomic parts are removable. Both for cleaning and should you decide to use the airbrush without them.


I ordered my airbrush with a 0.2mm nozzle and needle, however, Grex also supplies 0.3mm, 0.5mm and 0.7mm nozzle and needle sets. The needle and nozzle can be removed for cleaning or to change to a different size. This is done in the conventional way, by first removing the rear 'barrel', loosening the needle collet and then withdrawing the needle. Next you remove the nozzle cover and use the supplied spanner to loosen the nozzle, before unscrewing the nozzle and storing it so you don't loose it. The installation of a replacement needle and nozzle set is the reverse of the above.

In use:

I found the XGi very easy to use, and straight out of the box I was spraying very fine lines and patterns. the control of both air and paint on this double action airbrush is very precise and controllable. Although I have not tried it in anger, I think I could even spray WWII Italian Airforce 'smoke ring' camouflage. Probably at 1:72 as well.

The airbrush was comfortable to hold and after just a few minutes use I didn't notice the ergonomic grip. As the XGi is a 'conventionally' designed airbrush, I was able to get very close to the model especially with the supplied crown nozzle cap fitted.

Conclusion:

I already own a Grex Tritium.TG (review) and with the addition of the Genesis XGi I now have the flexibility of having the TG set up with a 0.3mm needle and nozzle for the spraying of larger parts and areas and the XGi set up with the 0.2mm needle and nozzle for smaller parts and finer detail. I have both set up with Grex quick release connectors so swapping between airbrushes in mid job couldn't be easier.

I am indebted to Sean Middleton of Top Notch Models the official UK agent for Grex airbrushes for his help and advice in the selection of this airbrush.

The Tritium and Genesis range of airbrushes are available in the UK from Top Notch Models. Sean is happy to discuss your needs, contact details.


Monday, 29 August 2016

AMK 1:48 Mig 31 B/BS

Review Built  

Part 3


Here in the UK we have had a three day weekend, so this entry is the progress of the build over the past three days. Once again I must sing the praises of this wonderful kit, the quality and fit is wonderful.

As I've never built an AMK model before I'm religiously following the supplied instructions, with the exception of where I can see that they will make things awkard when it come to spraying the model. The instruction booklet next called for me to assemble, paint and decal the cockpit.

Firstly I primed and painted the cockpit 'tub' and side pieces with Mig AMMO Russian Cockpit Green.
 
 
Next I applied the decals to the cockpit sides, the front and rear instrument panels, the decals are really thin and conformed nicely over the moulded cockpit detail with just minimal amounts of decal solution.


I followed up with an application of Mig Neutral Wash. Once dry I removed most of the wash to leave some where I thought the cockpit might look a little grimey.

The instructions then call for the cockpit 'tub' to be slid into the fuselage nose section. The fit is very tight and it did take me a bit of experimentation to find the exact spot that the 'tub' needed to be. 

 
Next up, is to locate the cockpit fuselage part to the main fuselage. However, before you do this, the instructions call for you to add 30 grams of nose weight undern the cockpit tub. I elected not to do this as I will be adding lead shot in the radome, which will have the advantage of being further forward of the model's fulcrum point.

 
The engine air intakes where the next sub assemblies called for in the instructions. Once again, I sprayed the parts with MR. PAINT and once dry, I added some Mig AMMO Black/Green wash to give the parts a grubby look.

 
Once assembled and set I added the intakes to the main assembly. It was here that I needed to test and get the intakes to fit as the kit tolerances are so fine that if any error creeps into your build it makes fitting difficult. Somewhere along the line I must have made the smallest of mistakes as once I had the intakes in place and cemented I did need just the smallest amount, a slight wipe of filler between the intakes and the main assembly.


The next stage called for me to move to the opposite end of the model and assemble the twin tail assemblies. 


Once assembed and set, the tails was added to the main assembly. The fit is again very good, however, again due to my inaccuracies, I needed just a wipe of filler on the underside of the jet pipes.


The instructions would now have you start putting the undercarriage doors in place however, as I will be masking the gear bays when I spary I jumped ahead a couple of stages and started work on the seats.


Next time I get to the bench I will be adding the photo etch seat belts to the seats and fitting them to the cockpit.

Monday, 22 August 2016


ICM 1:48 JU 88 A-4

In Box Review


The Ju 88A-4 was an improved variant of Junkers famous Schnellbomber ("fast bomber").  It featured a longer wingspan, due to the redesigned wingtips. Stronger defensive armament was added and the  Jumo 211 J-1 or J-2 engines given a boost in power to 1410 hp driving wooden bladed propellers. The undercarriage was reinforced and provision for four external bomb racks was added.


In the box are:

 8 grey sprues
1 clear sprue
A decal sheet
An instruction booklet 

On first inspection, it would appear that all of the sprues from the previous release are in this boxing. However, there are two new sprues with extra parts for this variant. This does mean that there is some spare parts in the box which will be loved by those modellers who keep the parts from kits that they haven't used in the build.

The sprues are of good quality with no flash. I could see no sink marks and the ejector pin marks appear to me in places that would show. The larger parts have no marks or blemishes sometimes seen because of temperature variants in the mould, although I have heard of such blemishes in some boxes, however reports say they don't affect the quality of the kit.

The instructions: 


The centre stapled instruction booklet consists of 24 pages and is very comprehensive, with detail drawings of each assembly stage including three paged of full colour painting and decal guides.

The decals:

 ICM has provided four decal options,:

Ju 88A-4, 9/KG 30 Sicily, Spring 1943
Ju 88A-4,stabSt/KG 3, Russia Spring 1942
Ju 88A-4, Stab 1/KG 77, Russia Spring 1942
Ju 88A-4, 8/KG 3 Russia Winter 1942

The decals are clear, bright and in register with minimal carrier film.
  

The sprues:


 The engines are reasonably detailed.


The clear parts are all free from blemishes and are very clear.

Conclusion:

ICM are once again on the ball with this offering of the Ju 88. The cost balanced against the quality mean that in my opinion, this is a kit that is a must for any modeller that is keen on WWII Luftwaffe planes. Having been lent this kit for review I'm very tempted to purchase one for myself.

I'm indebted to my Good Friend Darren Wilks for the loan of the kit for review, the problem is I have to give it back now!

Sunday, 21 August 2016

AMK 1:48 Mig 31 B/BS

Review Built  

Part 2


Following on from Part 1 of my build review of AMK's wonderful kit, this time I finish off the build of the engines and engine intakes, add them to the lower fuselage and make a start on the upper fuselage and wings.

First job was to finish off the landing gear bays which are constructed as part of the engine intakes.


Again the fit is excelent with no filler and minimal triming required. Painted with Alclad Light Aluminium and to lift the detail in the bays and to make them look nice and dirty I gave them a wash with Mig AMMO Black/Green wash.

Once dry the intakes, bays and the kits engines were added to the lower fuselage. Once again no work was required other than to file the cut sprue flashes.


As you can see the fit and the detail is awesome.


Next job was to build the nose wheel bay and assembly. Once again painted with Alclad Dull Aluminium and made to look used and a bit grubby with the same Mig AMMO wash used on the main landing gear bays.


Once dry, the nose wheel assembly was cemented into the lower fuselage half. The fit being the same as the rest of the kit, it just slotted into place.


At this point the lower fuselage assembly was put to one side and a start was made on the wings and upper fuselage assembly.


As the joins were still drying I only test fitted the upper and lower fuselages halves together, and once again everything fitted perfectly. 


I'm really enjoying this kit and built, the further I get into the build the more I feel that AMK are well on their way to taking away Tamigawa's shake and bake crown.

Next time the upper and lower fuselage halves go together and a start will be made on the cockpit and nose section.