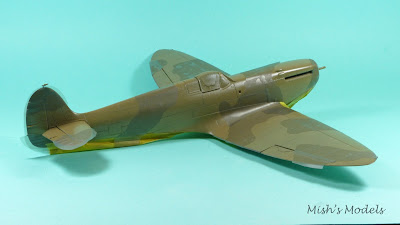
Tuesday, 29 December 2015

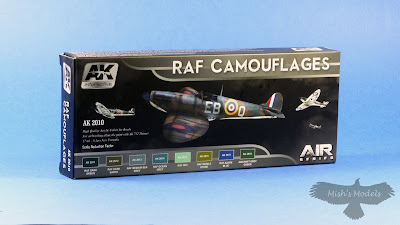
AK Interactive Acrylic Paint Set (RAF Camouflage)


 AK Interactive Acrylic Paint Set 

(RAF Camouflage)


Paints, every modeller has their favourite manufacturers. The choices are vast and varied. I know I have probable tried, if not all of them, then a large proportion of them. 

This set came to me by way of a friend who having purchased them wasn't keen on AK's colours, believing them to be wrong. Not being familiar with the AK range I did a bit of researching and from their website read this:

"This paint set includes the exact colors the British used to paint their aircrafts and has been formulated in consideration of the Scale Reduction Effect (subtle lighter than actual color), to obtain the correct colors in our kits. All of these colors have been carefully studied by historians and formulated to accurately represent the colors of the RAF."

So that explains the the colour looking wrong to my friend.

The set consist of eight 17ml plastic bottles and has the following colours:

-AK2011 RAF DARK GREEN
-AK2012 RAF DARK EARTH
-AK2013 RAF MEDIUM SEA GREY
-AK2014 RAF OCEAN GREY
-AK2015 RAF SKY
-AK2016 RAF MIDDLE STONE
-AK2017 RAF AZURE BLUE
-AK2018 AIRCRAFT GREY GREEN

This choice should cover most RAF aircraft of WWII


In use:

To my delight I found these paints sprayed straight from the bottle, after a bit of experimentation I found that I got the best results out of my H&S Evolution fitted with a 0.15mm needle/nozzle was to use an air pressure of between 5 PSI - 10 PSI. I did find that the bottles need to be shaken well to disperse the pigment which tends to settle out over time.

To make some comparisons I think the paint sprays like Vallejo Model Air and has the same translucently of Gunze paints. 

Conclusions:

Do I like the paints? You bet I do. They spray well and are trouble free to use. Will I be getting some more? Oh yes. Plenty of suppliers stock them and the cost is competitive. Do I like the colours? Again yes I do. I feel AK have got them just right to give a true scale colour.

Review - The Weathering Aircraft Magazine - Panels

The Weathering Aircraft Magazine

PANELS


Another magazine from the Mig AMMO stable, issue 1 concentrates on finishing model aircraft using a variety of methods and products. Consisting of 68 pages of large, detailed photos and text, it takes the reader through several techniques using six different models. 


The magazine covers how to scribe panel and rivet lines, highlighting panels, and apply washes to panel lines. Using “step by step” articles it takes us through multiple techniques from some of the worlds best modellers.

It covers the use of different products, techniques, and results available to modeller's This first issue also explains how to include panel techniques with the other weathering  techniques needed for model aircraft. 


 Conclusion:

Having never used enamel based washes before I have been waiting for a publication like this one that tells you exactly, in 'bite sized pieces' how to finish you models. So for the first time I have purchased some of the products feature in the issue and so far I'm please with the result (watch out for future review). 

The magazine is being published four times a year and costs £6.34/€9.00 per issue and a 12 month subscription costs £26.77/€38.00 


Thursday, 24 December 2015

Happy Christmas

I just wanted to take a moment to wish all my readers a


Have you ever wondered how Santa gets around the world in 24 hours and is never seen?


Wishing you and yours a Happy Christmas


Wednesday, 23 December 2015

Freeing up your Workspace

Freeing up your Workspace

How many times have you ended up building your model in a space about six inches square on a table that is much larger? If your anything like me every time you get  involved in a project. 

Well I have found a solution. Let me introduce you to the HOBBYZONE Modular Workshop System.


These units are produced by a HOBBYZONE in Poland at what I think is very cheap prices, even when you add post and packaging the cost is not prohibitive although postal costs do go up for countries outside of the EU.

Have a look at their promotional video:


I'm buying a few units at a time and adding them to my work bench so far mine looks like this:


The individual units arrive flat packed and you assemble using white PVA wood glue, the very comprehensive instructions show exactly how everything goes together and in what order. The units fit together and are held in place using small but very powerful rare earth magnets.  

Since having these units my desk has remained tidy and clutter free, however I have had to remember what drawer I've things in! 

Their website can be found here HOBBYZONE and their units are here Modular Workshop System


Using Masks for Camouflage 

Up until my recent Spitfire build using Revell's 1:32 Spitfire Mk.IIa kit.  I had never ventured into the world of masks. Why? I hear you ask. Well quite truthfully they scared me, in much the same way as using an airbrush used to scare me. I know it sounds silly doesn't it but some of us modeller are a bit apprehensive to try new products and techniques.

So it was with some trepidation that when the owner of Top Notch Models approached me with a set of pre-production 1:32 masks and asked me to try them on my build. So come the day when I could no longer faff around any more and had to bite the bullet.

The first job was to work out from the instructions and mask sheet what bit goes where on the kit. For the most part this was straight forward and got easier with the more parts I identified. There was a couple of masks that I couldn't work out there they went and a quick Skype call to the owner and designer soon put me right, apparently as I had a preproduction set the instructions were not yet complete and my input was noted and will be incorporated in the final instructions.

So now I know what bit goes where it was time to start using them. I was surprised how easy they were to apply and all where generously cut oversize so you can manoeuvre and place the mask exactly where you want it. The masks are cut from Oramask 810s vinyl masking material and are easy to peal off the model and replace if you don't get them exactly in the right place first time.

So once I had all the pieces in place the Spitfire looked like this:


You can see that I have laid the masks over RAF Dark Earth that I have sprayed earlier and protected with a coat of Klear/Future. 

The trick to using the masks is to make sure the mask edges are well 'sealed' by rubbing a cotton bud along all the mask edges so that no paint can seep under the masks.

After spraying the RAF Dark Green the model looked like this.


As you will see the masks have been removed and there is no paint bleed under the masks. 

Despite my initial trepidations, this has got to have been the most stress free and easiest method of applying camouflage to a model I have ever used.

I'm really pleased with the results and I am now a big fan of masks for painting camouflage on aircraft. You might want to give it a try on your next build.

Top Notch Models and the the masks I used. Top Notch Models also have a Facebook Group

After talking with the owner of Top Notch Models they are offering a generous 27% discount to all readers of of Mish's Models when they enter the code MISH15 at checkout.